Managing Dotfiles Conveniently with Chezmoi
Have you ever felt overwhelmed at the thought of setting up your development environment again after getting a new MacBook? Or perhaps you found a fantastic tool during work, but felt too lazy to set it up again in your personal environment at home? Have you ever hesitated to push your configurations to GitHub due to security concerns?
If you've ever used multiple devices, you might have faced these dilemmas. How can you manage your configurations consistently across different platforms?
Problem
Configuration files like .zshrc for various software are scattered across different paths, including $HOME (root). However, setting up Git at the root for version control of these files can be daunting. The wide range of scanning involved can actually make managing the files more difficult.
Maintaining a consistent development environment across three devices – a MacBook for work, an iMac at home, and a personal MacBook – seemed practically impossible.
Modifying just one Vim shortcut at work and realizing you have to do the same on the other two devices after work... 😭
With the advent of the Apple Silicon era, the significant disparity between Intel Macs and the new devices made achieving a unified environment even more challenging. I had pondered over this issue for quite some time, as I often forgot to set up aliases frequently used at work on my home machine.
Some of the methods I tried to solve this problem briefly were:
-
Centralizing dotfiles in a specific folder and managing them as a Git project
- The locations of dotfiles vary. In most cases, there are predefined locations even if they are not in the root.
- You cannot work directly in a folder with Git set up, and you still have to resort to copy-pasting on other devices.
-
Symbolic link
- To set up on a new device, you need to recreate symbolic links for all files in the correct locations(...). If you have many files to manage, this can be a tiresome task.
- The usage is more complex than Git, requiring attention to various details.
In the end, I resorted to using the Git method but only for files not in the root (~/.ssh/config, ~/.config/nvim, etc.), partially giving up on files using the root as the location (~/.zshrc, ~/.gitconfig, etc.) until I discovered chezmoi!
Now, let me introduce you to chezmoi, which elegantly solves this challenging problem.
What is Chezmoi?
Manage your dotfiles across multiple diverse machines, securely. - chezmoi.io
Chezmoi is a tool that allows you to manage numerous dotfiles consistently across various environments and devices. As described in the official documentation, with just a few settings, you can ensure 'security'. You don't need to worry about where your dotfiles are or where they should be. You simply need to inform chezmoi of the dotfiles to manage.
Concept
How is this seemingly magical feat possible? 🤔
In essence, chezmoi stores dotfiles in ~/.local/share/chezmoi and when you run chezmoi apply, it checks the status of each dotfile, making minimal changes to ensure they match the desired state. For more detailed concepts, refer to the reference manual.
Let's now briefly explain how to use it.
Getting Started with Chezmoi
Once you have installed chezmoi (installation guide here), perform the initialization with the following command:
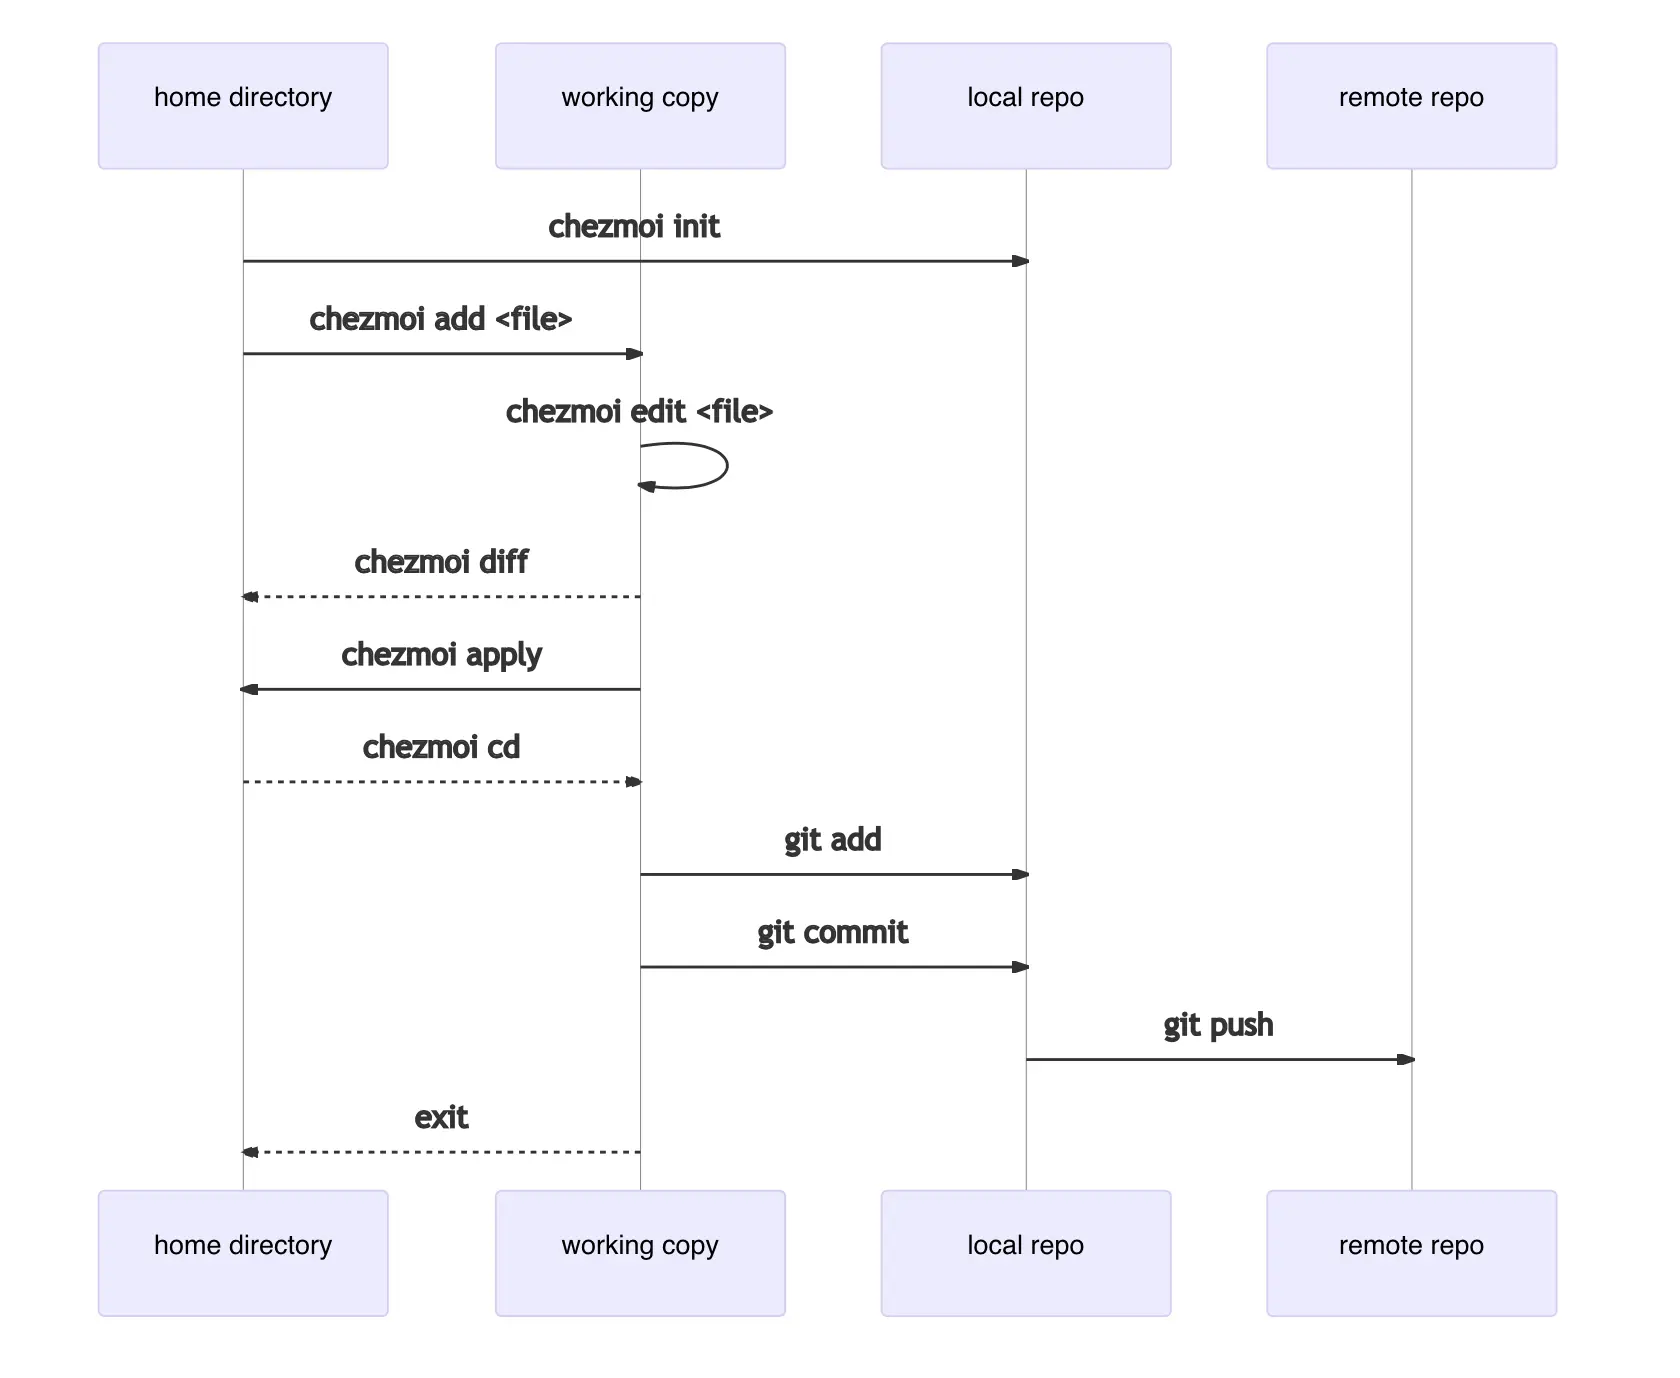
chezmoi init
This action creates a new Git repository in ~/.local/share/chezmoi (working directory) on your local device to store dotfiles. By default, chezmoi reflects modifications in the working directory on your local device.
If you want to manage your ~/.zshrc file through chezmoi, run the following command:
chezmoi add ~/.zshrc
You will see that the ~/.zshrc file has been copied to ~/.local/share/chezmoi/dot_zshrc.
To edit the ~/.zshrc file managed by chezmoi, use the following command:
chezmoi edit ~/.zshrc
This command opens ~/.local/share/chezmoi/dot_zshrc with $EDITOR for editing. Make some changes for testing and save.
If $EDITOR is not in the environment variables, it defaults to using vi.
To check what changes have been made in the working directory, use the following command:
chezmoi diff
If you want to apply the changes made by chezmoi to your local device, use the following command:
chezmoi apply -v
All chezmoi commands can use the -v (verbose) option. This option visually displays what is being applied to your local device, making it clear in the console. By using the -n (dry run) option, you can execute commands without applying them. Therefore, combining the -v and -n options allows you to preview what actions will be taken when running unfamiliar commands.
Now, let's access the source directory directly and push the contents of chezmoi to a remote repository. It is recommended to name the repository dotfiles, as I will explain later.
chezmoi cd
git add .
git commit -m "Initial commit"
git remote add origin https://github.com/$GITHUB_USERNAME/dotfiles.git
git push
By writing the relevant settings in the chezmoi.toml file, you can automate the repository synchronization process for more convenient use.
To exit the chezmoi working directory, use the following command:
exit
Visualizing the process up to this point, it looks like this:

Using Chezmoi on Another Device
This is why we use chezmoi. Let's fetch the contents on the second device using chezmoi. I have used an SSH URL for this example. Assume that chezmoi is already installed on the second device.
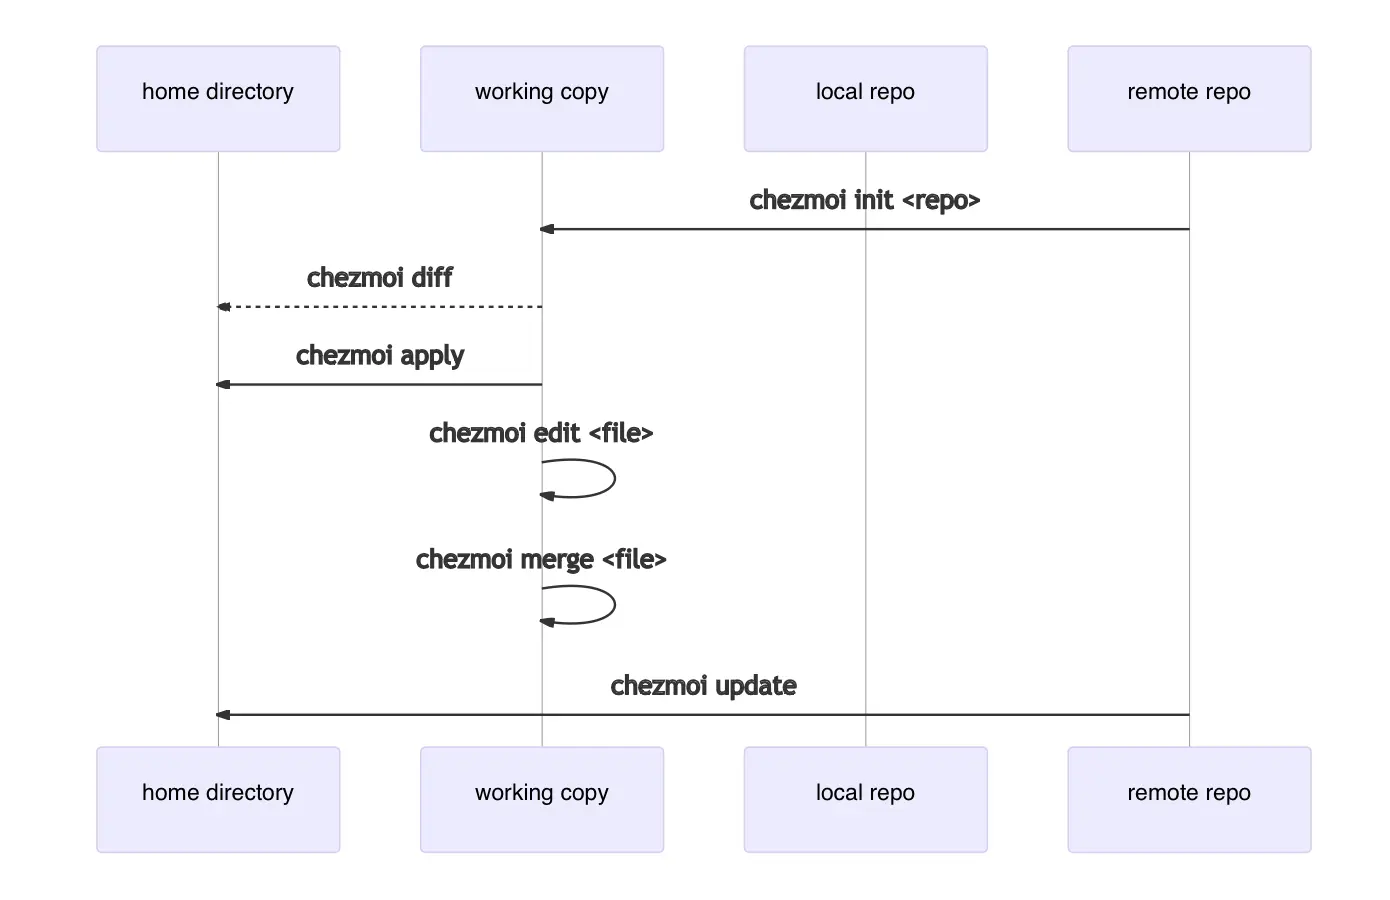
chezmoi init git@github.com:$GITHUB_USERNAME/dotfiles.git
By initializing with a specific repository, chezmoi automatically checks for submodules or necessary external source files and generates the chezmoi config file based on the options.
Inspect what changes chezmoi will bring to the second device using the diff command we saw earlier.
chezmoi diff
If you are satisfied with applying all the changes, use the apply command we discussed earlier.
chezmoi apply -v
If you need to modify some files before applying locally, use edit.
chezmoi edit $FILE
Alternatively, you can use a merge tool to apply local changes as if you were using Git merge.
chezmoi merge $FILE
Using chezmoi merge-all will perform a merge operation on all files that require merging.
You can perform all these steps at once with the following command:
chezmoi update -v
Visualizing this process, it looks like this:

You can also apply all the steps needed on the second device at initialization...! This feature can be incredibly useful if the second device is a newly purchased one.
chezmoi init --apply https://github.com/$GITHUB_USERNAME/dotfiles.git
I recommended naming the repository dotfiles earlier because if the repository is named dotfiles, you can use a shortened version of the previous command.
chezmoi init --apply $GITHUB_USERNAME

It's truly convenient...🥹 I believe it will be one of the best open-source tools discovered in 2023.
Conclusion
Chezmoi is impressively well-documented and actively developed. Developed in Golang, it feels quite fast 😄. With some knowledge of shell scripting, you can implement highly automated processes, creating an environment where you hardly need to intervene for settings across multiple devices.
In this article, I covered the basic usage of chezmoi. In the next article, we will delve into managing chezmoi configuration files and maintaining security.
If you are curious about my configurations, you can check them here.
