I think many backend developers either don't know much about network types or only use bridge networking even if they do.
I was also curious about this topic and conducted a study. This article is an excerpt from the content I presented during that study.
We'll conduct practical exercises using Orbstack to run VMs.
When developing with the Spring framework, it seems that using Docker for setting up DB environments is more common than installing them directly on the local machine. Typically, the workflow involves:
Using docker run before bootRun to prepare the DB in a running state
Performing development and validation tasks using bootRun
Stopping bootRun and using docker stop to stop the container DB
The process of running and stopping Docker before and after development tasks used to be quite cumbersome. However, starting from Spring Boot 3.1, you can use a docker-compose.yaml file to synchronize the lifecycle of Spring and Docker containers.
services: elasticsearch: image:'docker.elastic.co/elasticsearch/elasticsearch:7.17.10' environment: -'ELASTIC_PASSWORD=secret' -'discovery.type=single-node' -'xpack.security.enabled=false' ports: -'9200'# random port mapping -'9300'
During bootRun, the compose file is automatically recognized, and the docker compose up operation is executed first.
However, if you are mapping the container port to a random host port, you may need to update the application.yml every time docker compose down is triggered. Fortunately, starting from Spring Boot 3.1, once you write the compose file, Spring Boot takes care of the rest. It's incredibly convenient!
If you need to change the path to the compose file, simply modify the file property:
There are also properties related to lifecycle management, allowing you to appropriately adjust the container lifecycle. If you don't want the container to stop every time you shut down Boot, you can use the start_only option:
No matter how much test code you write, verifying the interaction with the actual DB was essential during the development process. Setting up that environment felt like a tedious chore. While container technology made configuration much simpler, remembering to run docker commands before and after starting Spring Boot was definitely a hassle.
Now, starting from Spring Boot 3.1, developers can avoid situations where they forget to start or stop containers, preventing memory consumption. It allows developers to focus more on development. The seamless integration of Docker with Spring is both fascinating and convenient. Give it a try!
After updating my Mac and finding that Docker was not working properly, I had to reinstall it. However, I encountered an error where the container was not running properly when running tests.
It turned out that there was an issue with the /var/run/docker.sock not being properly configured. Here, I will share the solution to resolve this issue.
Since Docker containers run in isolated environments, they cannot communicate with each other by default. However, connecting multiple containers to a single Docker network enables them to communicate. In this article, we will explore how to configure networks for communication between different containers.
Let's create a new Docker network using the docker network create command.
docker network create my-net
The newly added network can be verified using the docker network ls command, which confirms that it was created as a default bridge network since the -d option was not specified.
A container can be connected to multiple networks simultaneously. Since the one container was initially connected to the bridge network, it is currently connected to both the my-net and bridge networks.
Let's disconnect the one container from the bridge network using the docker network disconnect command.
Let's test if the two containers can communicate with each other over the network.
First, let's use the ping command from the one container to ping the two container. Container names can be used as hostnames.
dockerexec one ping two # PING two (172.18.0.3): 56 data bytes # 64 bytes from 172.18.0.3: seq=0 ttl=64 time=0.114 ms # 64 bytes from 172.18.0.3: seq=1 ttl=64 time=0.915 ms
Next, let's ping the one container from the two container.
dockerexec two ping one # PING one (172.18.0.2): 56 data bytes # 64 bytes from 172.18.0.2: seq=0 ttl=64 time=0.108 ms # 64 bytes from 172.18.0.2: seq=1 ttl=64 time=0.734 ms # 64 bytes from 172.18.0.2: seq=2 ttl=64 time=0.270 ms # 64 bytes from 172.18.0.2: seq=3 ttl=64 time=0.353 ms # 64 bytes from 172.18.0.2: seq=4 ttl=64 time=0.371 ms
Finally, let's remove the my-net network using the docker network rm command.
docker network rm my-net
# Error response from daemon: error while removing network: network my-net id 05f28107caa4fc699ea71c07a0cb7a17f6be8ee65f6001ed549da137e555b648 has active endpoints
If there are active containers running on the network you are trying to remove, it will not be deleted.
In such cases, you need to stop all containers connected to that network before deleting the network.
docker stop one two
# one
# two
docker network rm my-net
# my-net
When running multiple containers on a host, you may end up with networks that have no containers connected to them. In such cases, you can use the docker network prune command to remove all unnecessary networks at once.
docker network prune
WARNING! This will remove all custom networks not used by at least one container.
Are you sure you want to continue? [y/N] y
In this article, we explored various docker network commands:
ls
create
connect
disconnect
inspect
rm
prune
Understanding networks is essential when working with Docker containers, whether for containerizing databases or implementing container clustering. It is crucial to have a good grasp of networking as a key skill for managing multiple containers effectively.
Docker containers are completely isolated by default, which means that data inside a container cannot be accessed from the host machine. This implies that the container's lifecycle is entirely dependent on its internal data. In simpler terms, when a container is removed, its data is also lost.
So, what should you do if you need to permanently store important data like logs or database information, independent of the container's lifecycle?
You can also use tools like DBeaver or DataGrip to create users and databases.
When you're done, you can stop the container with docker stop postgres. Checking the container list with docker ps -a will show that the container is stopped but not removed.
$ dockerps-a CONTAINER ID IMAGE COMMAND CREATED STATUS PORTS NAMES 5c72a3d21021 postgres "docker-entrypoint.s…"54 seconds ago Exited (0)43 seconds ago postgres
In this state, you can restart the container with docker start postgres and the data will still be there.
Let's verify this.
Using the \list command in PostgreSQL will show that the testdb database still exists.
The subsequent steps are the same as those without using volumes. Now, even if you completely remove the container using docker rm, the data will remain in the volume and won't be lost.
As mentioned earlier, for long-term storage of log files or backup data, you can use volumes to ensure data persistence independent of the container's lifecycle.
We have explored what Docker volumes are and how to use them through a PostgreSQL example. Volumes are a key mechanism for data management in Docker containers. By appropriately using volumes based on the nature of the container, you can manage data safely and easily, which can significantly enhance development productivity once you get accustomed to it. For more detailed information, refer to the official documentation.
A containerization technology that allows you to create and use Linux containers, and also the name of the largest company supporting this technology as well as the name of the open-source project.
The image everyone has seen at least once when searching for Docker
Introduced in 2013, Docker has transformed the infrastructure world into a container-centric one. Many applications are now deployed using containers, with Dockerfiles created to build images and deploy containers, becoming a common development process. In the 2019 DockerCon presentation, it was reported that there were a staggering 105.2 billion container image pulls.
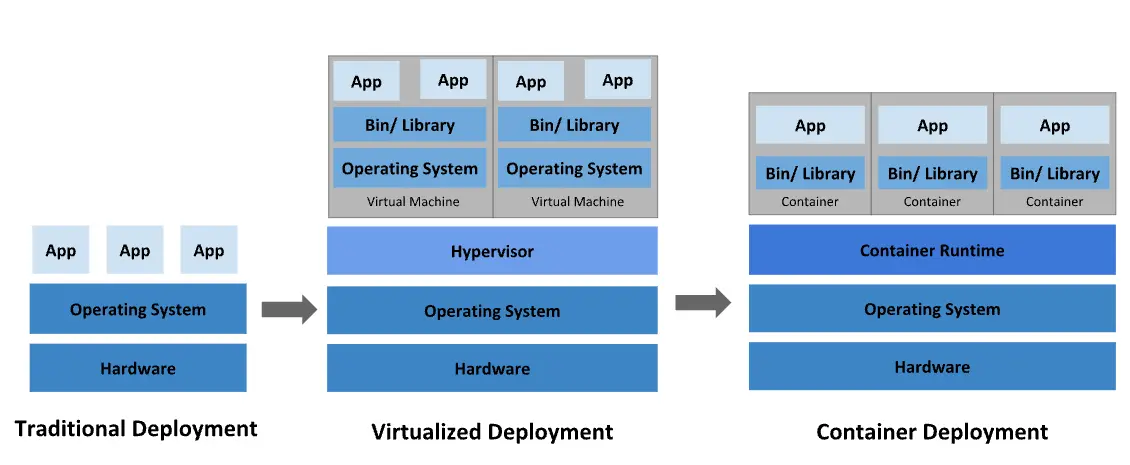
Using Docker allows you to handle containers like very lightweight modular virtual machines. Additionally, containers can be built, deployed, copied, and moved from one environment to another flexibly, supporting the optimization of applications for the cloud.
As long as the container runtime is installed, Docker containers guarantee the same behavior anywhere. For example, team member A using Windows OS and team member B using MacOS are working on different OSs, but by sharing the image through a Dockerfile, they can see the same results regardless of the OS. The same goes for deployment. If the container has been verified to work correctly, it will operate normally without additional configuration wherever it is run.
Docker's containerization approach focuses on the ability to decompose, update, or recover parts of an application without needing to break down the entire application. Users can share processes among multiple applications in a microservices-based approach, similar to how service-oriented architecture (SOA) operates.
Each Docker image file consists of a series of layers, which are combined into a single image.
Docker reuses these layers when building new containers, making the build process much faster. Intermediate changes are shared between images, improving speed, scalability, and efficiency.
Docker-based containers can reduce deployment time to mere seconds. Since there is no need to boot the OS to add or move containers, deployment time is significantly reduced. Moreover, the fast deployment speed allows for cost-effective and easy creation and deletion of data generated by containers, without users needing to worry about whether it was done correctly.
In short, Docker technology emphasizes efficiency and offers a more granular and controllable microservices-based approach.
When deploying with Docker, images are used with tags. For example, if you deploy using version 1.2 of an image, and version 1.1 of the image is still in the repository, you can simply run the command without needing to prepare the jar file again.
docker run --name app image:1.2
docker stop app

## Run version 1.1
docker run --name app image:1.1
Package the jar file to be deployed on the local machine.
Transfer the jar file to the production server using file transfer protocols like scp.
Write a service file using systemctl for status management.
Run the application with systemctl start app.
If multiple apps are running on a single server, the complexity increases significantly in finding stopped apps. The process is similarly cumbersome when running multiple apps on multiple servers, requiring commands to be executed on each server, making it a tiring process.
Use a Dockerfile to create an image of the application. → Build ⚒️
Push the image to a repository like Dockerhub or Gitlab registry. → Shipping🚢
Run the application on the production server with docker run image.
You don't need to waste time on complex path settings and file transfer processes. Docker works in any environment, ensuring it runs anywhere and uses resources efficiently.
Docker is designed to manage single containers effectively. However, as you start using hundreds of containers and containerized apps, management and orchestration can become very challenging. To provide services like networking, security, and telemetry across all containers, you need to step back and group them. This is where Kubernetes1 comes into play.
Developers can find Docker extremely useful in almost any situation. In fact, Docker often proves superior to traditional methods in development, deployment, and operations, so Docker containers should always be a top consideration.
When you need a development database like PostgreSQL on your local machine.
When you want to test or quickly adopt new technologies.
When you have software that is difficult to install or uninstall directly on your local machine (e.g., reinstalling Java on Windows can be a nightmare).
When you want to run the latest deployment version from another team, like the front-end team, on your local machine.
When you need to switch your production server from NCP to AWS.
Using Docker containers allows for convenient operations while solving issues that arise with traditional deployment methods. Next, we'll look into the Dockerfile, which creates an image of your application.


 The image everyone has seen at least once when searching for Docker